
The most important WordPress security step is keeping everything updated, because plugins are where 91% of new vulnerabilities are found and nearly half never get a fix before the flaw is made public. Everything else on this checklist builds from there. It’s ordered from the five-minute wins that matter most down to server-level hardening, so you can stop wherever your time or access runs out and still have covered the things that count. Every step links to a full guide, and the hands-on claims come from our own tests on a WordPress 7.1.3 site.
Work top to bottom. The first handful of steps block the attacks that actually happen to small sites; the later ones close doors that fewer attackers reach but that matter once the basics are done. If you only do the first five, you’ve handled most of the real risk.
First, how WordPress sites actually get hacked
Before the checklist, know how WordPress sites actually get hacked, because it tells you where to spend your time. Two numbers frame it.
First, plugins are the risk. Patchstack’s State of WordPress Security in 2026 counted 11,334 new vulnerabilities in the ecosystem in 2025, and “91% of new vulnerabilities were found in plugins,” against six in core, all minor (Patchstack, Feb 2026). WordPress itself is rarely the hole; your plugins are.
Second, attacks are fast, and your host’s firewall won’t save you. The same report found the median time from disclosure to first exploit is five hours for heavily attacked vulnerabilities, and that traditional defenses blocked only 12% to 26% of WordPress-specific attacks in their tests. The reliable defense is not running vulnerable code and not exposing easy doors, which is what this checklist does.
The other truth, from our own testing: most of WordPress’s weak points are open by default. XML-RPC accepts password guessing, the REST API lists your usernames, there’s no login-attempt limit, and debug logs land in a public folder. Hardening is mostly closing defaults, not adding exotic protection.
The five-minute wins (do these first)
The five-minute wins below block the most common attacks and take minutes each. If you do nothing else, do these.
1. Keep WordPress, plugins, and themes updated
Updating is the single most important thing you can do, because an unpatched known vulnerability is the easiest way in. Turn on automatic updates for plugins and themes, and let core auto-update. Given that exploits can land five hours after a fix is published, manual updating on your own schedule is usually too slow. On our test site, enabling auto-updates for all plugins stored the choice and showed each plugin as auto-updating. Pair it with a recent backup in case an update ever misbehaves.
2. Use strong, unique passwords and a password manager
Every account needs a long, unique password it shares with no other site. Reused and weak passwords are what brute-force and credential-stuffing attacks feed on. Don’t trust WordPress to enforce this: in our testing, the login form accepted 123456, and a scripted request with the strength check skipped set a password to abc and logged in. The meter is a nudge, not a wall, so set the standard yourself and use a password manager.
3. Turn on two-factor authentication
Two-factor authentication is the backstop that makes a stolen password useless, because the attacker also needs the code on your phone. WordPress has no built-in 2FA, so add it with a plugin. On our test site, once 2FA was on, the correct password alone returned a code prompt and set no login cookie: right password, still locked out. Enable it for every administrator. Full setup, including the one gap it leaves (application passwords): setting up two-factor authentication.
4. Limit login attempts
Cap how many times anyone can try to log in, so an attacker gets a handful of guesses instead of thousands. By default, WordPress sets no limit: our test script made 200 wrong guesses in 18 seconds, and every one was accepted for checking. A rate limit cut the same run off after about 21 tries. Use a plugin if you have no server access, or rate-limit at the server if you do. Details and the XML-RPC bypass to close alongside it: limiting login attempts.
5. Make sure you have working backups
A current, tested, off-site backup is what turns a disaster into an inconvenience. Everything else reduces the chance of a hack; a backup is what saves you when one gets through anyway. Use a backup plugin or your host’s system, store copies off the server, and actually restore one somewhere to confirm it works. Backup setup and testing is its own topic, in the maintenance cluster; for security, the rule is simply: have one, keep it off-site, and test it.
Lock down the login and the entry points
With the basics done, lock down the login and the other entry points attackers probe. These take a bit longer, but each shuts off a real attack path.
6. Disable or restrict XML-RPC
XML-RPC is an old API, on by default, that gives attackers a login door with no rate limiting and a way to try many passwords in one request. On our test site, a single system.multicall request carried 100 password guesses, and the server checked all 100 in 87 milliseconds. If nothing on your site uses it (Jetpack and the older mobile apps do), disable it; if something does, restrict it. disabling XML-RPC.
7. Stop username enumeration
WordPress hands out your login names by default, which means attackers only have to guess passwords. On our test site, /?author=1 redirected to the first user’s author page and the REST route /wp-json/wp/v2/users listed account slugs to anyone. Use display names that differ from login names and restrict the users REST endpoint. auditing user accounts.
8. Audit your user accounts
Every administrator account is a full key to the site, so keep the list short and current. Remove accounts nobody uses, demote accounts that don’t need their power, and reassign content when you delete. Note that WordPress records no last-login date, so finding inactive accounts needs a plugin or team knowledge. Run this quarterly and after anyone leaves: our auditing user accounts guide.
9. Review application passwords
Application passwords are separate credentials for apps and scripts, and they bypass two-factor authentication entirely. A leaked one is a full login; your 2FA does nothing to stop. Review them on every account, delete any you can’t place or that belong to retired tools, and give each integration its own. We confirmed on the test site that an application password logs into the REST API and XML-RPC with no second factor even when 2FA is fully on. Our auditing user accounts guide.
10. Consider hiding the login URL
Moving the login off /wp-login.php cuts automated login noise, but it’s security through obscurity: it hides the door without locking it. On our test site, a hidden login 404’d the old paths, yet XML-RPC still accepted the real password. Do this only after steps 3, 4, and 6, as a finishing touch, never instead of them. changing the login URL.
Secure the configuration and files
Secure the configuration and the files that hold your secrets and control what runs where. Most need SFTP or a file manager; a few need server access.
11. Lock the admin file editor
Add define( 'DISALLOW_FILE_EDIT', true ); to wp-config.php to remove the dashboard’s plugin and theme code editor, the tool an attacker uses to rewrite your PHP after stealing an admin session. On our test site this returned 403 for the editor and removed it from the menu, while updates still worked. Safe on every site. wp-config.php security settings.
12. Rotate your secret keys after any scare
The salts in wp-config.php sign your login cookies, and changing them logs everyone out at once, which is your emergency reset after a compromise. On our test, rotating the keys bounced a valid admin cookie straight to the login page. Replace any sample 'put your unique phrase here' placeholders immediately; they leave cookies effectively unsigned. our wp-config.php security settings guide.
13. Keep debug logs out of public view
If you enable debug logging, send the log outside the web root, because the default wp-content/debug.log is publicly readable. On our test site, that default URL returned the log, file paths and all, to an anonymous request. Keep debug display off in production and, if you log, log to a path outside the site folder. our wp-config.php security settings guide.
14. Remove readable copies of wp-config.php
Never leave a wp-config.php.bak, .old, or editor swap file in the site folder, because the server runs .php but serves everything else as plain text. On our test, the live file was safe but wp-config.php.bak handed over the database password in full. Delete such copies and add one server rule as a backstop. our wp-config.php security settings guide.
15. Set correct file permissions
Files should be 644, directories 755, and wp-config.php 600 or 400, but the right value depends on who owns the files. On our test, wp-config.php at 400 was safe when the web server owned it and broke the site when root owned it and the server was only in the group. Never use 777: we showed an unrelated user writing a PHP file into a 777 folder. WordPress file permissions.
16. Stop PHP running in the uploads folder
The uploads folder holds media, so block it from executing PHP, and a backdoor dropped there can’t run. On our test, a PHP file in uploads ran and returned 200 until we added a rule, after which it returned 403 while images still loaded. This one rule defangs a whole class of file-upload attacks. cleaning up a hacked site.
Secure the connection
Secure the connection with HTTPS, which underpins the rest: logins, cookies, and application passwords all depend on it.
17. Move the whole site to HTTPS
Serve every page over HTTPS, because logins and cookies sent over plain HTTP can be read in transit, and WordPress won’t even offer application passwords without it. Install a certificate (most hosts give a free auto-renewing one), update your site URLs, and redirect HTTP to HTTPS. Confirm your certificate renews automatically; Let’s Encrypt’s lifetime is dropping to 45 days by 2028. moving WordPress to HTTPS.
18. Fix mixed content after the move
After switching to HTTPS, fix any http:// resources your pages still load, because the browser blocks insecure scripts outright. On our test, a secure page’s insecure image was silently upgraded but its insecure script was blocked and never ran, which can break a form or widget without any visible error. Check the browser console and fix each reference at its source. our moving WordPress to HTTPS guide.
19. Add HSTS once HTTPS is solid
Once HTTPS works everywhere, add the Strict-Transport-Security header so browsers refuse to load your site over HTTP at all. Set it carefully, because it’s hard to undo and a broken certificate then locks visitors out. Start with a short max-age, confirm nothing breaks, then raise it. security headers.
Add security headers
Headers tell the browser to be stricter. They’re a cheap, high-value layer once HTTPS is in place.
20. Add the safe starter headers
Add X-Content-Type-Options, Referrer-Policy, and Permissions-Policy at the server. These don’t restrict what loads, so they won’t break your theme, and they close off MIME-sniffing, referrer leakage, and unused device features. If you use nginx, watch the trap we hit: adding any header inside a location block cancels the inherited ones, so put them in a shared snippet. Skip the obsolete X-XSS-Protection, which MDN warns can itself create vulnerabilities. our security headers guide.
21. Add a Content-Security-Policy carefully
A Content-Security-Policy controls which scripts and styles may run, and it’s the strongest header and the easiest to get wrong. On our test, a strict default-src 'self' broke the block editor completely, while a WordPress-aware policy left every admin screen working. Always deploy it in report-only mode first, widen it to fit your plugins, then enforce. our security headers guide.
Keep watch and be ready
Keep watch and stay ready, because hardening is not one-and-done; these steps keep the site secure over time.
22. Audit plugins for vulnerabilities and abandonment
Run a plugin audit regularly, because a plugin that’s safe today can have a public vulnerability next week, and an abandoned one will never be patched. Match your installed plugins against a vulnerability database, and flag anything not updated in over a year or pulled from the directory. Delete what you don’t use: deactivating leaves the files on the server, and we showed a deactivated plugin’s file still running when requested directly. checking for vulnerable plugins.
23. Pick a reputable security plugin or host WAF
A security plugin or a host or CDN firewall adds monitoring and blocks some attacks before they land. Treat it as a layer, not the whole defense: remember traditional defenses blocked only 12% to 26% of attacks in Patchstack’s tests. A server-side scanner that reads your files catches more than one that only sees your public pages. Our existing security plugin roundup compares the options.
24. Monitor for changes and watch Search Console
Set up monitoring so you learn about a hack from a tool, not from your host suspending you. A file-integrity monitor flags changed core files, and Google’s Search Console Security Issues report flags hacked content, malware, and deceptive pages when Google detects them. Connect Search Console and check it; it’s free and it’s often the first warning.
25. Know your recovery plan
Decide in advance what you’ll do if the site is hacked, because the time to figure it out is not mid-incident. The short version: back up the hacked site as-is, take it offline, change every password and rotate the keys, replace core and plugins with fresh copies, remove unknown files and admins, scan clean, then close the hole that let them in. The full walkthrough, including the three checks that confirm a hack, is our cleaning up a hacked site guide.
Check your work with Site Health
WordPress has a built-in report that flags several of these for you, so use it to check your work. Tools → Site Health rates your site and lists issues, including whether you’re on HTTPS, whether updates are current, and whether debug mode is exposed.
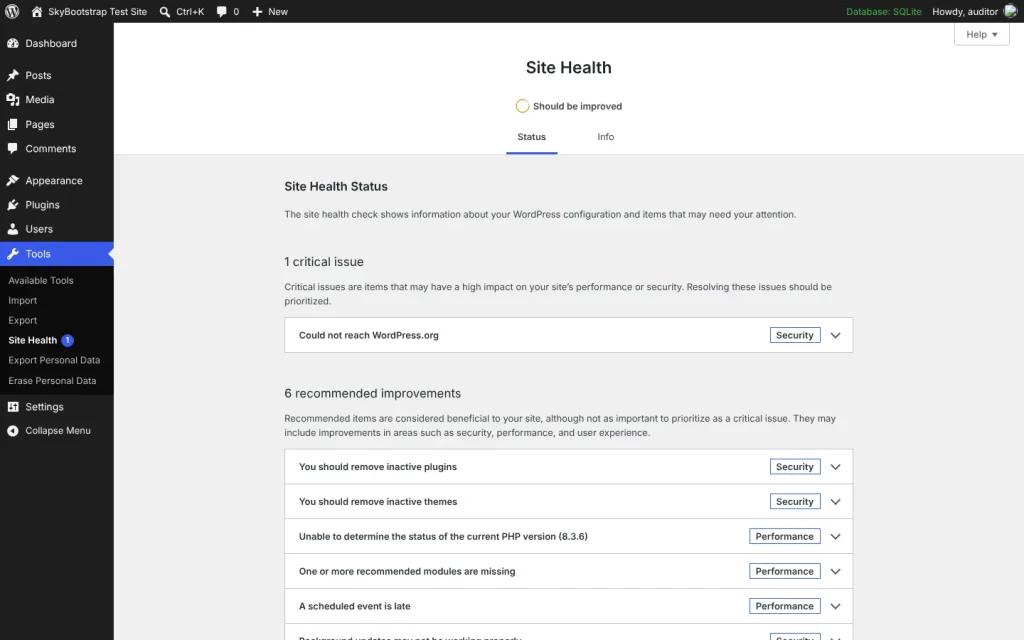
It won’t catch everything on this list, many of these steps are things Site Health doesn’t test, but a site with outstanding Site Health warnings has easy wins still open. Clear those first, then work the rest of this checklist.
Frequently Asked Questions
What is the single most important WordPress security step?
Keeping WordPress, plugins and themes updated. Patchstack found 91% of 2026’s new vulnerabilities were in plugins, and heavily attacked flaws are exploited within hours of disclosure. An unpatched plugin is the most common way in, so turning on automatic updates, backed by a recent backup, protects you against more real attacks than any other single step on this list.
Do I need a security plugin to secure WordPress?
No, a plugin isn’t required, but one helps. Most of hardening is closing defaults: strong passwords, two-factor login, limited login attempts, updates and HTTPS. A security plugin or a host firewall adds monitoring and blocks some attacks, but in Patchstack’s tests traditional defences stopped only 12% to 26% of attacks, so treat a plugin as one layer, not the whole defence.
How often should I run through a WordPress security check?
Treat the five-minute wins as always-on, then review the full list quarterly and immediately after any staff change or scare. Plugins pick up new vulnerabilities constantly, so a plugin that was safe last quarter may not be now. A quarterly pass over accounts, plugin versions, and backups, plus Google Search Console’s security report, keeps the site from drifting back into risk.
Is WordPress itself insecure?
No. WordPress core is rarely the problem: Patchstack recorded only six core vulnerabilities in 2025, all low priority, against more than 11,000 across plugins and themes. The risk comes from what you add and how it’s configured, not from WordPress itself. Keeping core updated and choosing well-maintained plugins carefully is what keeps a WordPress site secure.
Where to start
Where to start, if this is a lot: the five-minute wins. Update everything and turn on auto-updates, use strong unique passwords, enable two-factor authentication, limit login attempts, and confirm your backups work. Those five handle most of the real risk to a small site, and none needs server access.
From there, work down as your time and access allow. A hobby blog that does the first eight or ten steps is in good shape. A store or business site, where a breach means lost sales and exposed customer data, is worth taking all the way through the server-level steps and the ongoing monitoring. Whatever you run, the order is the point: the steps near the top stop the attacks that actually happen, so time spent there is never wasted.